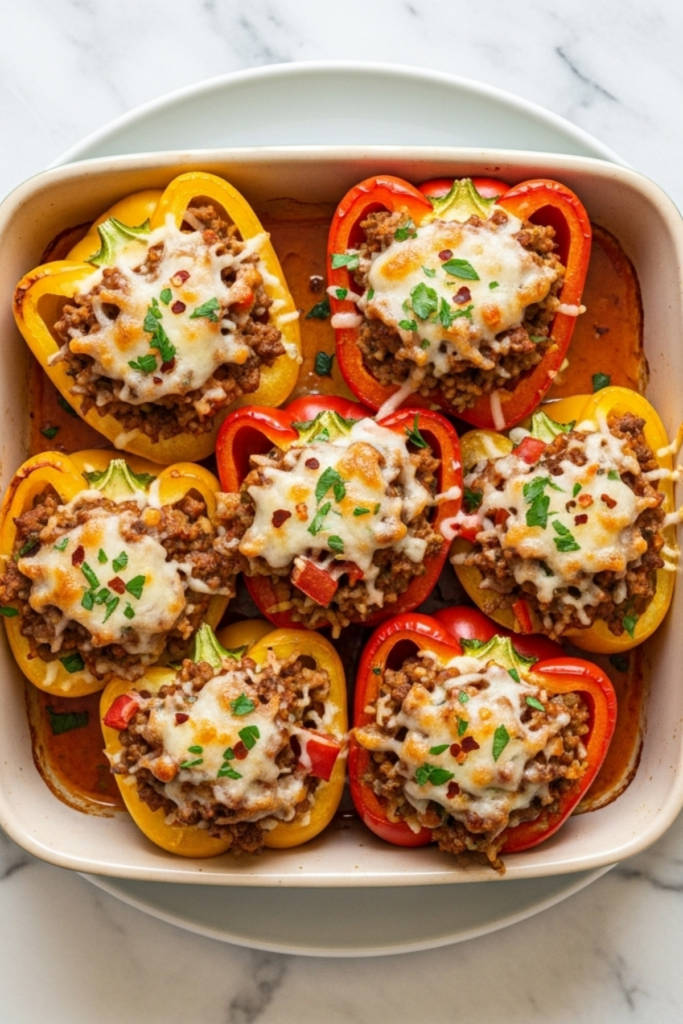
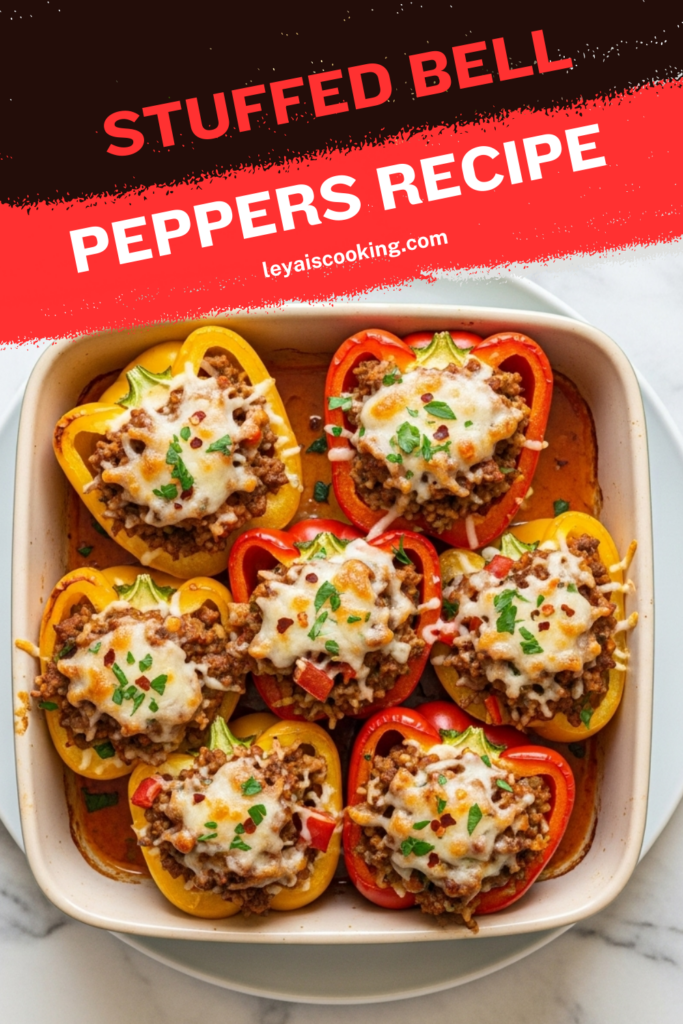
Classic Stuffed Peppers feel like a warm hug on a plate. Cozy, colorful, and just a little nostalgic.
This is the kind of dinner that shows up when everyone’s hungry and nobody wants drama. Simple food, real flavor, zero fuss.
I grew up eating stuffed peppers, the kind filled with seasoned beef, soft rice, and cheese that melts into everything. Leya’s version stays true to that comforting spirit, with a few gentle upgrades.
There’s something satisfying about peppers doing double duty, both the vessel and the star. They hold everything together, literally.
This recipe keeps things friendly and flexible. It welcomes swaps, tweaks, and a bit of personal flair.
Let’s get cooking. Dinner’s waiting.
Why This Recipe Feels So Classic?
Classic stuffed peppers don’t need fancy tricks. They win hearts by being honest and hearty.
The balance is what makes them special. Savory meat, tender rice, bright tomatoes, and melty cheese all share the spotlight.
The peppers soften just enough to become sweet and silky, but still sturdy enough to hold all that goodness.
Leya grew up on this style of stuffed pepper, and it shows. The flavors feel lived-in, familiar, and deeply comforting.
It’s one of those recipes that works for a quiet Tuesday or a full house on Sunday.
Ingredients Needed for the Recipe
Bell peppers – the edible bowls that hold everything together and soften beautifully in the oven
Olive oil – used to cook the filling and bring gentle richness
Ground beef – the savory base that adds heartiness and depth
Onion – builds sweetness and rounds out the flavor
Jalapeño (optional) – adds a soft, friendly heat if you like a little kick
Garlic – brings warmth and aroma
Fire-roasted tomatoes – give a smoky, slightly sweet tomato flavor
Shredded cheese – melts into the filling and bubbles on top
Paprika – adds color and mild smokiness
Dried oregano – gives a cozy herbal note
Dried basil – brings gentle freshness
Salt and pepper – pulls all the flavors together
Cooked rice – makes the filling tender and satisfying
Fresh parsley – brightens everything at the end
Red pepper flakes – optional garnish for extra warmth
How to make Stuffed Bell Peppers Recipes?
"Make this recipe yours—just save it to your Pinterest!"
Step 1 – Prep the Oven and Peppers
Preheat the oven to 425°F. Bring a pot of water to a boil while you work.
Wash the bell peppers, cut off the tops, and scoop out the seeds and membranes. Keep the chopped tops, toss the stems.
If a pepper won’t stand upright, shave a tiny bit off the bottom. Flat bases are happy bases.
Step 2 – Soften the Peppers
Drop the peppers into the boiling water and blanch for about five minutes.
This softens them slightly so they bake up tender later.
Set the softened peppers into a lightly oiled baking dish.
Step 3 – Cook the Vegetables
Heat olive oil in a large pan over medium heat.
Add chopped onion, pepper tops, and jalapeño if using. Cook until softened, about five minutes.
Add garlic and cook for one minute, just until fragrant.
Step 4 – Brown the Meat
Add ground beef to the pan.
Break it apart and cook until no longer pink, about five to six minutes.
Let it get a little golden. That flavor matters.
Step 5 – Add Tomatoes, Rice, and Seasonings
Stir in fire-roasted tomatoes, paprika, oregano, basil, salt, and pepper.
Add cooked rice and mix everything together.
Remove from heat once everything is evenly combined.
Step 6 – Stir in Cheese
Add half of the shredded cheese to the filling.
Stir until melted and creamy.
It should smell dangerously good at this point.
Step 7 – Stuff the Peppers
Spoon the filling into each pepper.
Pack it in gently, don’t squish it.
Top each pepper with the remaining shredded cheese.
Step 8 – Bake Until Bubbly
Place the dish in the oven.
Bake for 15 to 20 minutes, until peppers are tender and cheese is bubbly.
Cool slightly, garnish, and serve.
Flavor Variations to Try
Once you’ve made the classic version, it’s hard not to play around.
Swap ground beef for turkey or chicken for a lighter feel. It still tastes cozy.
Use Italian sausage for a bold, savory twist.
Go vegetarian with sautéed mushrooms, lentils, or tofu. Add extra herbs for depth.
Change the cheese. Pepper jack for heat, mozzarella for stretch, cheddar for richness.
Add spices like cumin, chili powder, or a dash of Worcestershire sauce for something new.
Tips
Choose thick-walled peppers so they hold their shape while baking
Don’t skip softening the peppers or they’ll stay too firm
Season the filling generously, rice needs flavor love
Use freshly shredded cheese for better melting
Let the peppers rest a few minutes before serving
Serving Ideas That Just Work
Classic stuffed peppers are a full meal on their own, no side dish pressure.
But a simple green salad makes a nice, fresh contrast.
Garlic bread or warm rolls soak up any extra filling.
Top with sour cream, yogurt, or hot sauce for a fun finish.
They also make great leftovers, maybe even better the next day.
Storing and Reheating
Leftover stuffed peppers keep well in the fridge for up to five days.
Store them in a sealed container so they stay moist and flavorful.
Reheat in the oven for the best texture, or microwave for convenience.
You can freeze them too. Wrap well and freeze for up to three months.
Thaw overnight in the fridge before reheating.
Still comforting. Still delicious.
That’s it. Classic Stuffed Peppers, simple, soulful, and endlessly lovable.
If you make them, Leya would love to hear how yours turned out. Did you spice them up? Keep them classic?
This is the quintessential stuffed bell peppers recipe I grew up on, with bell peppers stuffed with seasoned ground beef, rice, and melty cheese—so good! Perfect for an easy, hearty, and nutritious family dinner that’s both comforting and customizable.
ingredients
4-6 bell peppers (any color – green, yellow, red, orange)
1tablespoon olive oil
1lb ground beef (450g – can substitute turkey, chicken, pork, or sausage)
1 medium onion (chopped)
1 jalapeno pepper (chopped (optional, for spicy))
5cloves garlic (chopped)
14.5ounces fire roasted tomatoes (canned – or use diced tomatoes or tomato sauce)
1cup shredded cheese (cheddar, mozzarella, or pepperjack)
1tablespoon paprika
1teaspoon dried oregano
1teaspoon dried basil
Salt and pepper (to taste)
1cup cooked rice (white, brown, or wild rice)
Instructions
1
Preheat your oven to 425°F (220°C) and bring a large pot of water to boil.
2
Wash the bell peppers, slice off the tops, and scoop out seeds and membranes. If needed, trim a small slice off the bottom so they stand upright. Chop the edible parts of the tops (discard stems) to add later.
3
Blanch the peppers in boiling water for 5 minutes to soften slightly. Alternatively, roast them at 425°F for 20 minutes.
4
Place softened peppers in a lightly oiled baking dish.
5
Heat olive oil in a large pan over medium heat. Add chopped onion, reserved pepper tops, and jalapeño (if using). Cook 5 minutes until soft.
6
Add garlic and cook 1 minute until fragrant.
7
Add ground beef and cook 5–6 minutes, breaking it apart, until no longer pink.
8
Stir in fire roasted tomatoes, paprika, oregano, basil, salt, pepper, and cooked rice. Remove from heat.
9
Mix in ½ cup of shredded cheese into the filling.
10
Stuff each pepper with the meat-rice mixture and top with remaining cheese.
11
Bake for 15–20 minutes until peppers are tender and cheese is bubbly and golden.
12
Cool slightly, garnish with fresh parsley and red pepper flakes, then serve.
Nutrition Facts
Servings 4
Serving Size 1 stuffed pepper half
Amount Per Serving
Calories385kcal
% Daily Value *
Total Fat20g31%
Saturated Fat9g45%
Trans Fat0.5g
Cholesterol65mg22%
Sodium620mg26%
Potassium890mg26%
Total Carbohydrate28g10%
Dietary Fiber5g20%
Sugars8g
Protein24g48%
Calcium 220 mg
Iron 3.5 mg
* Percent Daily Values are based on a 2,000 calorie diet. Your daily value may be higher or lower depending on your calorie needs.
Note
Vegetarian option: Swap ground beef for lentils or plant-based crumbles and use vegetable broth.
Cheese tip: For best texture, add cheese after freezing—don’t freeze with cheese already on top.
Make ahead: Prep filling and blanch peppers a day ahead; assemble and bake when ready.
Freezer-friendly: Cool completely, wrap individually, and freeze for up to 3 months.
Pin this recipe to share with your friends and followers.
Christopher Nolan
Food and Lifestyle Blogger
Hi, I'm Samantha, a full-time food blogger, mother of 2 beautiful daughters and a lovely wife. I live in New Jersey with my family. Loves traveling, sharing new recipes, and spending time with my family.